
This post can be the continuation of this:
In this case, we want to install a Proxy Server (can be Apache or Nginx for example).
To install Apache in a Linux Debian installation:
- apt-get update
- apt-get install apache2
To start the service:
- sudo service apache2 start
Enable mod_proxy modules in Apache:
- sudo a2enmod proxy_http
Configuring virtual hosts using mod_proxy:
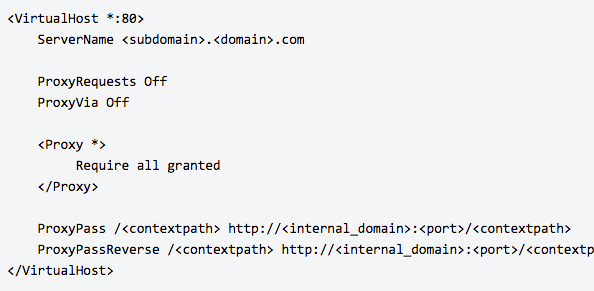
Note that for Debian, the preferred approach is to add the virtual host block to a separate configuration file for each application in /etc/apache2/sites-available/<site>, for example named confluence.conf and/or jira.conf. These should be based on the default template, 000-default.conf.
Remember the last slash!! If not your jira will be visible without styles and render 🙂
In some cases, you may need to add a trailing slash to your ProxyPass and ProxyPassReverse directives. For example:
ProxyPass /<contextpath> http://<internal_domain>:<port>/<contextpath>/
ProxyPassReverse /<contextpath> http://<internal_domain>:<port>/<contextpath>/
If your Jira show this message:

- you are using a reverse proxy, but the values for
proxyNameandproxyPortare incorrect in your<install-directory>/conf/server.xmlfile.
If you are using a reverse proxy, make sure the the proxyName and proxyPort attributes have correct values for your reverse proxy. Your connector should look similar to the example below, and the recommended settings will be displayed in the warning.

Now we have the Apache Reverse Proxy installed and listen in the port 80 (http).
To continue with the next part (listen in 443 https protocol) we need to create a valid certificate for the Proxy.
We can use a multi-domain certificate *.mydomain.com or a custom certificate, for example jira.mydomain.com
If we don’t want a selfsigned certificate, but we want a “green” certificate, we can try the Let’s Encrypt certificate of the Linux Foundation.
Just write this instructions in your Linux Debian System:
- sudo apt-get install python-certbot-apache -t stretch-backports
- sudo certbot –authenticator webroot –installer apache
- sudo certbot certonly –authenticator standalone –pre-hook “apachectl -k stop” –post-hook “apachectl -k start”
Remember to anote the Key and Pem files and paths of the certificate. We will need in the new virtual host for the https (Listen 443) port.
And to automating renewal of the certificate:
- sudo certbot renew –dry-run
Now we can install the mod_ssl in Apache!
- sudo a2enmod ssl
Now we are ready to config the ssl virtual host in /etc/apache2/sites-available/
Something similar to this…(but remove the JkMount part)
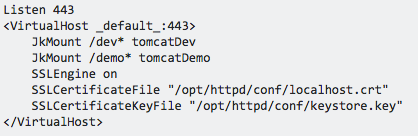
Remember to copy the file to the /etc/apache2/sites-enabled/
And remember to change in the server.xml file of the Jira Tomcat again the connection to the Apache Reverse Proxy port 443.
Now we can do the final step, redirect http links to https protocol.
We install the mod_rewrite module to Apache:
- sudo a2enmod rewrite
Just edit the 80 port virtual host file 000-default.conf. and add these lines:
RewriteEngine On
RewriteCond %{HTTPS} !=on
RewriteRule ^/?(.*) https://%{SERVER_NAME}/$1 [R,L]
Start Jira, and start Apache. That’s all! You have now https with green certificate enabled!
By MrAddon


